for the Laser Tag application online for you to download, dissect, reuse and hopefully improve. The code is
C++ and compiled in a super old school Codewarrior IDE for windows but it is oepnGL based and writtenusing openFrameworks which is a cross platform library for writing creative code. So it should be very
straight forward to run in Visual Studio, DevC++ or even xcode on a mac.
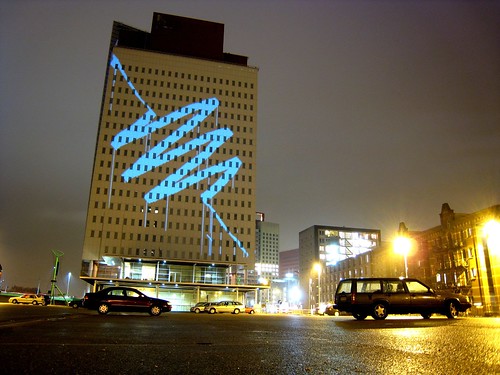
In its simplest form the Laser Tag system is a camera and laptop setup, tracking a green laser point across
the face of a building and generating graphics based on the laser's position which then get projected back
onto the building with a high power projector.
There are a bunch of things you need to do to get Laser Tag up and running yourself, so here follows the requiredequipment and setup instructions. This will assume that you using windows but it will also apply for other OSs too.
EQUIPMENT
We used:
1 PC Laptop - ASUS A8JS - Core 2 Duo 1.83 Ghz 1GB Ram Nvideo Geforce Go 7300 256MB - VGA and DVI out.
1 Pansonic PTD5600U 5000 ANSI Lumens 1024x768 DLP Projector.
1 Watec 221S Security/Astrononmy Camera with manual iris zoom lens.
1 Bogen magic arm and super clamp.
1 Pinnacle PCTV USB capture card.
1 60mW Green Laser (super illegal in a lot of places and very dangerous)
and loads and loads of AAA batteries.

SETUP
Location:
Choose a building or wall that the laser shows up well on. If using a building make sure the lights aren't on
as this will make the tracking of the laser beam harder (also it is not a good idea to point powerful lasers
at a building with people in it) .
Pick a spot far enough back that the projector can overshoot the building by a couple of feet on all sides.
Alignment and calibration:
If the building is vertically orientated and the projector can handle it, put the projector on its side so you are
using the full image of the projection.
Fix the projector in place and then fix the camera underneath the lens of the projector so that it is looking at the
projection area. Allow the camera to see a little more than the projection area so that you can designate an areaas a clear button.
Make sure all the settings on the camera are set to manual - no auto exposure or gain control etc. Adjust the color
balance of the camera so that it looks as natural as possible - make sure any lights in the shot don't look green as this
will confuse the tracking sytem.
Software setup:
Set your resolution of your screen to 1024 by 768.
Connect the projector to the PC and in your display control panel set the display mode to horizontal span.
This should span the Desktop across the laptop screen and the projector so that you have one large screenof 2048 by 768 resolution. If you have access to openGL and 3D preferences in the control panel, set all settings
to performance.
Connect the camera to the usb capture card and the capture card to the PC. You can use Amcap
to make sure you can capture video okay.
Start the app and you should see something like the image bellow.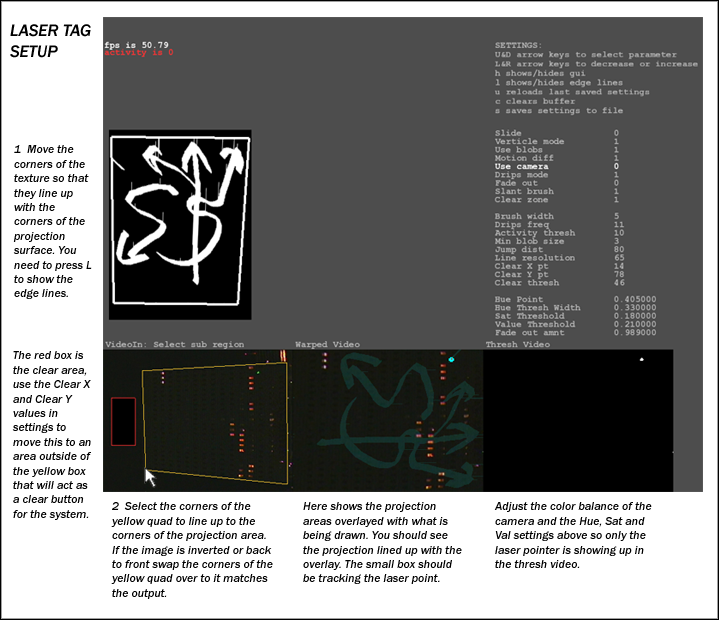 Follow the instructions in the diagram to align the camera to the projection surface.
If the building is vertically orientated and the projector can handle it, put the projector on its side so you are
using the full image of the projection.
Fix the projector in place and then fix the camera underneath the lens of the projector so that it is looking at the
projection area. Allow the camera to see a little more than the projection area so that you can designate an areaas a clear button.
Make sure all the settings on the camera are set to manual - no auto exposure or gain control etc. Adjust the color
balance of the camera so that it looks as natural as possible - make sure any lights in the shot don't look green as this
will confuse the tracking sytem.
Software setup:
Set your resolution of your screen to 1024 by 768.
Connect the projector to the PC and in your display control panel set the display mode to horizontal span.
This should span the Desktop across the laptop screen and the projector so that you have one large screenof 2048 by 768 resolution. If you have access to openGL and 3D preferences in the control panel, set all settings
to performance.
Connect the camera to the usb capture card and the capture card to the PC. You can use Amcap
to make sure you can capture video okay.
Start the app and you should see something like the image bellow.
Follow the instructions in the diagram to align the camera to the projection surface.Once the camera is aligned to the projector hide the white alignment lines on the projected image by pressing L.
Turn down the iris of the camera to the point where the surface is as dark as possible but the laser still shows up strong.
Settings:
The settings for the app are saved in an xml file so once you have made your adjustments hit the S key to save your changes.
The up and down arrows on your keyboard will run through the list of settings and the left and right arrows can adjust the values.
The first settings you will want to adjust is the four at the bottom - which define the color tracking of the laser.
Hue Point - should be the value of green that the camera sees the laser as.
Hue Thresh - is how wide a range from the hue point it should consider.
Sat Thresh - is the minimum amount of saturation.
Value Thresh - is the minimum brightness.
Anything that is outside the range of these settings will show up as black in the Thresh Video anything that is whithin
(hopefully only the laser point) should show up white.
Here is an explanation of the rest of the settings:
Slide - slides the screen over so you can see what is being projected
Verticle mode - if the projector is being used on its side.
Use blobs - should stay on, blob tracking ended up being more reliable than motion difference.
Motion diff - don't touch
Use camera - toggle between using the live camera and an included test video.
Drips mode - when on, small drips of paint will descend from the letter forms.
Fade out - slowely fades the image over time - alternative to clear button.
Slant brush - toggles chisel brush and fatcap mode
Clear zone - Use an area of the image as a clear zone, if the laser is detected there it clears the image.
Brush width - Size of brush
Drips freq - How many drips you want - lower is more
Activity thresh - This determines the time before starting a new line, the background screen should flash red whenever a new line begins.
Min blob size - the smaller this value the more sensitive to noise it will be but also the smoother the line motion.
Jump dist - the max distance to draw a line between two captured points, any distance greater means it starts a new line.
Line resolution - how many points to interpolated a line with, higher number means smoother line but uses more cpu.
Clear X - adjust x position of clear area.
Clear Y - same for y
Clear thresh - lower means a more sensitive clear area , higher less sensitive - adjust so that only laser point clears image.
NOTES
Once everything is setup be very careful not to bump either projector or camera as even a move of a 1mm will be
enough to mess the alignment.
The settings are saved in settings.xml file - if you want to back up your settings for a location just zip the file and rename it.
If you are pushed for framerate - try overclocking your graphics with hacked drivers from laptopvideo2go,
you will notice quite a difference!
Press h to hide all gui except the projected image, this can also give you a bump in the framerate too.
DOWNLOAD
UPDATE: !!!!! LASER TAG 2002 IS RELEASED - Feb 2008 - Download Here !!!!!
official page -> http://graffitiresearchlab.com/projects/laser-tag/


